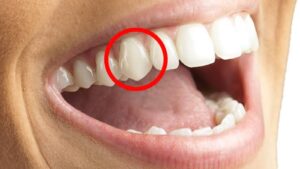
A before and after photo makes a crown look like a cosmetic decision. Most of the time it isn’t. By the point a tooth needs a crown, it’s usually been patched, cracked, or root-treated, and the photo captures only the last few millimetres of a much longer story. Knowing what sits behind those two images helps you judge whether a crown suits your tooth, and what a good result should honestly look like.
The “before” is about structure, not colour.
Patients almost always point at the shade or the chipped edge. The first thing we assess is how much sound tooth is left underneath.
A typical “before” tooth has a large old filling with hairline cracks running from it, or it has been root-treated and has gone brittle and grey.
Some have simply been ground down over twenty years of clenching until the enamel is gone and the softer dentine underneath has worn into a dish shape. These teeth often don’t hurt. That is exactly why people leave them, and why a piece breaks off during something ordinary like a bread roll.
Dr Priya Shanmugalingam has spent more than twenty years working in general and restorative dentistry, including years in regional practices where complex cases could not simply be referred elsewhere. That background shapes how we plan a crown: the question is not just whether we can cover the tooth, but whether the tooth underneath will still be worth keeping in a decade.
What actually happens between the two photos
Assessment and shade planning
Before anything is prepared, we check the bite, the gum health around the tooth, and the condition of the root. Gums that bleed will recede after treatment and expose a margin, so inflammation gets settled first. Shade is recorded at this visit rather than later, because teeth dehydrate and lighten during a long appointment, and a shade chosen mid-procedure often ends up too pale once the tooth rehydrates.
Preparation and the temporary crown
The tooth is reduced by roughly one to two millimetres to make room for the crown material. Old filling material and any decay come out at the same time, which occasionally reveals more damage than the X-ray suggested.
A digital scan or impression is taken, and a temporary crown protects the tooth while the permanent one is made. If you want the clinical detail on materials and staging, our page on crowns and bridges sets out the options, though most patients find the choice becomes obvious once they know which tooth is involved.
Fitting the final crown
At the second visit, the crown is tried in before it is cemented. This is the point where contacts, bite and colour get adjusted. A crown that feels marginally high on the day will feel enormous by the evening, so it is better to be fussy here than to accept it and come back.
📖 People also read about:
How to read a before and after result properly
Look past the whiteness. Three things separate a good outcome from a merely bright one.
The first is the gum line. Healthy pink tissue that hugs the crown with no dark shadow means the margin sits where it should. The second is shape. A restored tooth should have the same width-to-height proportion as its neighbours, not a squarer, bulkier outline. The third is surface texture. Natural teeth carry faint horizontal lines and a slightly uneven light reflection, while a flat, glassy tooth reads as artificial even when the colour is a perfect match.
Photographs taken straight after cementation also flatter the result, since the gums are still slightly blanched from the procedure. A picture taken two weeks later is more honest.

Why some crown results look obviously false
Two problems account for most of it.
📖 People also read about:
Over-bright shade selection is the common one. A single crown matched to an idealised white rather than to the teeth beside it will always announce itself. Matching to the neighbouring tooth, including its imperfections, is what makes a crown disappear.
The second is material chosen without regard to the space available. Porcelain fused to metal needs more thickness to hide its metal substructure, and when there isn’t room, the result is an opaque tooth with a grey line at the gum. Modern all-ceramic and zirconia options handle front teeth better in most cases. The decision belongs with the individual tooth, not with a general preference for one material.
💡 Need help?
We offer professional smile gallery to help you achieve your goals.
What the “after” looks like in year five
A well-made crown does not change colour, because ceramic does not stain the way natural enamel does. That creates its own issue over time: if you whiten your natural teeth later, the crown stays exactly as it was and the match drifts. Whitening before crown work, not after, avoids that.
The tooth underneath still needs care. Decay can develop at the margin where the crown meets the tooth, and gum recession can expose that join. Clenching and grinding remain the fastest way to fracture ceramic, which is why a nightguard often forms part of the plan rather than an optional extra.
Our approach at Advanced Dental Care leans toward comprehensive treatment planning rather than short-term cosmetic fixes, and that usually means addressing the cause of the damage alongside restoring the tooth.

See what a crown could do for your tooth.
If you have a tooth that is cracked, heavily filled, root-treated, or worn flat, the useful next step is an assessment rather than a quote. Bring any concerns about how the result will look, because shade and shape decisions are far easier to make together at the planning stage.
Advanced Dental Care Mosman is at Suite 107/1-3 Gurrigal St, and Dr Priya is a member of the Australian Dental Association and a Fellow of the International Congress of Oral Implantologists. Call (02) 99693982 or get in touch with our Mosman team to arrange a consultation.
Note: Any surgical or invasive procedure carries risks. Before proceeding, you should seek a second opinion from an appropriately qualified health practitioner. Results vary between individuals.